
One of the most happening thing on Internet today is of course blogging, you will find kids, house wives and even film stars with their own blogs.
One common question that everybody asks is what's the difference between a blog and a website ?
...A blog (or a "Web log") is nothing but a Web site, usually maintained by an individual, focused on a single theme or a bunch of categories, descriptions of events or reviews of gadgets, products or even other blogs and websites. Posts/articles are usually displayed in reverse-chronological order. "Blog" can also be used as a verb which means to maintain or add content to a blog.
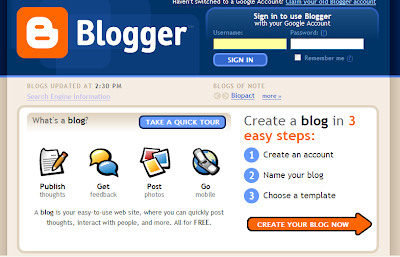
If you too want to enter the Internet's huge Blogosphere, then you can easily start it without spending a single penny, by registering yourself for free at Blogger.Com.
For those of you who do not know about Blogger - it's a website which provides blogging platform and has been bought by Google a few years back. So if you have a Google account {a gmail account}, then you can use the same log in ID and password to enter in to Blogger.
So once you enter (and select a Display name), you will be asked to create the blog. Select any name (eg. ABCD), and you will get a blog like this:
www.ABCD.blogspot.com
And moreover, just like email ID's there's no limit to the number of blogs you can make, provided the blog names are available.
This is exactly like choosing an email ID, you cannot select any blog name, which is already existing. But do not worry, you can change this [Blog Name] whenever you want, if the new name has not been already taken (that means you can shift from ABCD to DEFG.blogspot.com, provided DEFG has not been taken already).

After selecting the name, you have to select the template for the blog, the default templates given by Blogger are really boring, so do not waste time there, select anyone, as you can change and add a much better template afterwards !
Now you will be asked to post your first article, it's your wish to whether do it now or you may do it after taking a small coffee break, you can also save an incomplete post as a draft if you want to publish it later.
ctually, In order to make a blur effect in the photo is not difficult; we only make a little code to create it. Please drop your mouse into the photo below so that you understand my explanation.

Please read the following steps to make the blur effect like the photo above.
1st Steps
Log in into blogger with your ID
Click the Layout
Click Edit HTML tab and don’t forget to click Download Full Template and Back up the template first. (very important)
Find the following code ]].>, then Copy and Paste the code below above ]].>
.linkopacity img {
filter:alpha(opacity=30);
-moz-opacity: 0.30;
opacity: 0.30;
border:0;
}
.linkopacity:hover img {
filter:alpha(opacity=100);
-moz-opacity: 1.0;
opacity: 1.0;
border:0;
}
.linkopacityxtra:hover img {
filter:alpha(opacity=1.1);
-moz-opacity: 1.1;
opacity: 1.1;
border:0;
}
Save the template
2nd Steps
Every time you want to put a photo or picture, insert this code;
For example, I have the URL address of the photo or picture like this;
http://24rohman.googlepages.com/Water-06.jpg
And I want to link that URL address to http://www.blogspottutorial.com, so I have to put the code below;

and the result will be like this. Please drop your mouse and click the image if you want:
But If you don’t want to link the photo or picture anywhere, just change the URL address with the following code #nogo, for example;
and then this is the result, just drop your mouse and click it. It doesn’t happen anything, right?
Ok, my friend, do you understand? I think you do. For showing the pictures in the blog was explained completely by me with the title Google page creator. You can read again if you forget or still do not understand.
I give you a little clue about CSS code above, you can change the level of blurring the picture by adding or reducing the opacity value, for example;
.linkopacity img {
filter:alpha(opacity=30);
-moz-opacity: 0.30;
opacity: 0.30;
border:0;
}
The opacity value = 30 is reduced into opacity = 30 (this is example only), so the picture will look to have more blur, example;
.linkopacity img {
filter:alpha(opacity=10);
-moz-opacity: 0.10;
opacity: 0.10;
border:0;
}
You can do your own experiments to get better result. Ok, see you at the next posting and don’t miss it dude.
0 comments:
Post a Comment