Showing posts with label Tips And Tricks. Show all posts

Sunday, August 2, 2009

Disable Highlighting of Newly Installed Programs in Windows XP

Disable Highlighting of Newly Installed Programs in Windows XP:

Windows XP has a default tendency to highlight newly installed programs. Refer the images below.

This is a feature of XP that sometimes ikrs me.
And guess what? This can be easily disabled in a few simple steps.
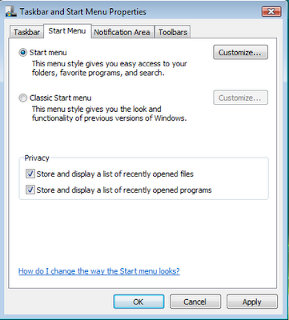
You have to use the Taskbar and Start Menu Properties window to make any changes to the Windows XP Start Menu.Here's how you do it..

1. Right click the Taskbar and click Properties to open the Taskbar and Start Menu Properties Window.

2. Click the Customize button to open the Customize Start Menu box.


3. Uncheck Highlight newly installed programs in the Start menu settings section.

Windows Vista too has this behaviour. The steps to disable highlighting in Windows Vista are almost the same, but with a few minor changes.


Get Informer means To Get Informed on All Information Here. Fun, Songs, Videos, Latest Pictures, Google Adsense, Urdu SMS, Poetry, Cricket and More. Just Keep Visitin For more Updates

Windows Vista: Disable Highlighting of Newly Installed Programs

Windows Vista: Disable Highlighting of Newly Installed Programs:

Very recently, I had posted on How to disable highlighting of newly installed programs in Windows XP.

Like XP, Windows Vista too has this behaviour set as the default. Disabling this is in Vista is almost the same as in XP, but with a few minor adjustments (which really dosen't matter).
The steps below will help you to get this done:
1. Right-Click the Taskbar and Click Properties. The Taskbar and Start Menu Properties windows appears (image below).Now, hit the Start Menu tab and click the Customize button.


2. The Customize Start Menu window is displayed (See image below). Find and uncheck the Highlight newly installed programs checkbox from the list.
Click Ok to close the window.
Get Informer means To Get Informed on All Information Here. Fun, Songs, Videos, Latest Pictures, Google Adsense, Urdu SMS, Poetry, Cricket and More. Just Keep Visitin For more Updates

Download YouTube videos with a 'Kiss'

Download YouTube videos with a 'Kiss':


This probably is the best way to download a video from YouTube. No Firefox addons, plugins or other third-party apps needed. Just a web browser and the word 'kiss'

.KissYouTube is a website that makes this possible. To download a video, you just have to add the word 'kiss' before the words 'youtube' in the YouTube video url.

For example, here's a video url of Nora, the piano playing cat:http://www.youtube.com/watch?v=TZ860P4iTaMTo download this video just add 'kiss' to the url as shown below:http://www.kissyoutube.com/watch?v=TZ860P4iTaMWithin KissYouTube, you'll have the option to watch or download this video.


Get Informer means To Get Informed on All Information Here. Fun, Songs, Videos, Latest Pictures, Google Adsense, Urdu SMS, Poetry, Cricket and More. Just Keep Visitin For more Updates

Copy Contacts from other Email Accounts to Yahoo

Copy Contacts from other Email Accounts to Yahoo:

If you haven't noticed yet (like me), Yahoo Mail is currently running a teaser within the mail box that allows you to transfer your email contacts, address book and calender from other email accounts to your Yahoo mail account.

This wizard of Yahoo actually uses a third party service called TrueSwitch to copy information from other email accounts to Yahoo.

How do ya do this?
1. Click on the link provided in Yahoo and you'll be taken to a page where Yahoo will request for your permission to proceed. Read the details/disclaimer from the page and click I Agree if you intend to go ahead.
2. The Transfer your info to Yahoo Mail page appears. Enter your old email id from where you want to copy information and select the domain.Presently you can copy from 14 different email domains which include Gmail, Hotmail, Msn, AOL, Yahoo, Cox, Comcast, Earthlink, cs.com, Juno, Netscape, Netzero, OptOnline and WorldNet.

3. Choose what you want to transfer, like Email, Address Book or Calender.
You are also given the option to notify your old email contacts about this change.
Agree to the Terms of Service if you indeed agree and click Start Transfer.
The email, address book and calender will be transferred to your Yahoo! Mail account within the next 24 hours.


Get Informer means To Get Informed on All Information Here. Fun, Songs, Videos, Latest Pictures, Google Adsense, Urdu SMS, Poetry, Cricket and More. Just Keep Visitin For more Updates

Add Google Talk Gadget to your Firefox Sidebar

Add Google Talk Gadget to your Firefox Sidebar :

Ever since Google launched the new Google Talk Gadget, a lot of options are emerging like adding Google Talk in Orkut83, adding Google Talk to a blog or webpage84.As you must have guessed from the title, Google Talk can also be added within the Firefox Sidebar.

1. Right-click the link talkgadget.google.com/talkgadget/client85 and click Bookmark this link..

2. Go to the bookmarks menu and find the bookmark you have just added. Right-click the bookmark and click Properties.

3. In the Properties window, tick Load this bookmark in the sidebar and click Ok.


That's all. I still have the old Google Talk IM installed in my desktop and I'll be removing it soon. This new Google Talk gadget has kinda made the old IM obsolete.


Enable Auto Login in Windows XP:

Do you enter your login and password everytime you start your Windows XP machine?Well, if you are the only user in your computer there is no need to enter the password each and everytime you login.Removing the password prompt will also speed up the boot process.You can set Windows XP to automatically login with your password.

And here's how:

1. Go to Start >> Run

2. Type control userpasswords2 and press Enter.


3. The User Accounts screen appears. Uncheck Users must enter a username and password to use this computer checkbox. Click Ok.

4. The Automatically Log On screen appears. Specify the Username for which you want to set auto login. Also, don't forget to include the password for the user.

5. Click Ok and Restart your machine.

Additionally, if other users are added, you may want to disable auto login by repeating all the above steps, except that in step 3; where you'll have to tick the check box.


Get Informer means To Get Informed on All Information Here. Fun, Songs, Videos, Latest Pictures, Google Adsense, Urdu SMS, Poetry, Cricket and More. Just Keep Visitin For more Updates

Convert Images to Ascii letters

Convert Image To ASCII Letter :
ASCII-O-Matric is a Flash based web application that lets you convert any images into Ascii code or in the form of squares.Shown below are images converted into both forms; letters and squaresBesides converting, there are options provided to add colours to the text or squares.However, there are drawbacks. You can only upload jpeg or jpg files with a 60 x 50 pixel dimension.

VDOOGLE! Search videos from YouTube, Metacafe, Google Videos, MySpace and more:


If the 'OOGLE' in VDOOGLE sounds a 'bit' familiar to you, don't be surprised. After all, Vdoogle's search is powered by Google.What's that?VDOOGLE is a shared video search engine that let's you search video content from most of the popular video sharing websites. And the list of supported video sharing websites ain't small either.Vdoogle searches content from :

http://www.youtube.com/

http://www.video.aol.com/

http://www.video.google.com/

http://www.vids.myspace.com/

http://www.metacafe.com/

http://www.ifilm.com/

http://www.videocodesworld.com/

http://www.videocodezone.com/

http://www.bolt.com/

http://www.dailymotion.com/

http://www.break.comstage6.divx.com/

http://www.clipshack.com/

http://www.vsocial.com/

http://www.youare.tv/

http://www.veoh.com/

http://www.getinformer.blogspot.com

Apart from this, there exists a featured video section where a random video of the day is displayed to the user.So if you're looking for a quick video search, you know where to go.


Get Informer means To Get Informed on All Information Here. Fun, Songs, Videos, Latest Pictures, Google Adsense, Urdu SMS, Poetry, Cricket and More. Just Keep Visitin For more Updates

Saturday, July 25, 2009

Increase Your DSL and Dial Up Internet Speed

This tweak is for broadband cable connections on stand alone machines with winXP professional version - might work on Home version also. It will probably work with networked machines as well but I haven't tried it in that configuration. This is for windows XP only.This tweak assumes that you have let winXP create a connection on install for your cable modem/NIC combination and that your connection has tcp/ip - QoS - file and print sharing - and client for microsoft networks , only, installed. It also assumes that winxp will detect your NIC and has in-box drivers for it. If it doesn't do not try this. In the "My Network Places" properties (right click on the desktop icon and choose properties), highlight the connection then at the menu bar choose "Advanced" then "Advanced Settings". Uncheck the two boxes in the lower half for the bindings for File and Printer sharing and Client for MS networks. Click OK1. From the windows XP cd in the support directory from the support cab, extract the file netcap.exe and place it in a directory on your hard drive or even in the root of your C:\ drive.2. Next, open up a command prompt window and change directories to where you put netcap.exe. then type "netcap/?". It will list some commands that are available for netcap and a netmon driver will be installed. At the bottom you will see your adapters. You should see two of them if using a 3Com card. One will be for LAN and the other will be for WAN something or other.3. Next type "netcap/Remove". This will remove the netmon driver.4. Open up control panel / system / dev man and look at your network adapters. You should now see two of them and one will have a yellow ! on it. Right click on the one without the yellow ! and choose uninstall. YES! you are uninstalling your network adapter, continue with the uninstall. Do not restart yet.5. Check your connection properties to make sure that no connection exists. If you get a wizard just cancel out of it.6. Now re-start the machine.7. After re-start go to your connection properties again and you should have a new connection called "Local area connection 2". highlight the connection then at the menu bar choose "Advanced" then "Advanced Settings". Uncheck the two boxes in the lower half for the bindings for File and Printer sharing and Client for MS networks. Click OK.8. Choose connection properties and uncheck the "QOS" box9. Re-start the machine10. After restart enjoy the increased responsiveness of IE, faster page loading, and a connection speed boost.

Get Informer means To Get Informed on All Information Here. Fun, Songs, Videos, Latest Pictures, Google Adsense, Urdu SMS, Poetry, Cricket and More. Just Keep Visitin For more Updates